My bread-making tales begin somewhere around February of 2010. Lori (my mother-in-law) had bought a Cuisinart breadmaker at Costco and told me about all the bread she had been making with it. I thought that was so cool. Then, soon after that, she gifted me one of my very own. I was in the middle of undergoing chemotherapy (month 4 of 6) and was unable to work during this time. While I still had some energy and desire to not just lay in bed all day (I had to stop work because I worked with 4-5 year olds--- ie, germ machines which would lead to infection), she thought I may enjoy making bread. And was she ever right. I made all kinds of bread-- french, italian, whole wheat, cinnamon swirl-- it was so fun. I was really good at the cinnamon swirl, french and italian. The others just didn't come out very well. They would be too dense, or the things that were supposed to be mixed in only got mixed into half of the loaf. Anyways, lots of good bread baking still!
I should also put in here- Keenan likes his bread. I mean, really likes his bread. It is one of those things that we would splurge on-- nice, Publix, bakery bread. When I started baking our bread, the crusty french bread was my best loaf, but it just was not very sandwich friendly. It was great for dipping in oil and spices but even after I got an electric knife and would do a small or medium loaf, we still had sandwiches that were really bread-y. So, I would just make an open face sandwich but after a while, the bread making became less and less. I would make it occasionally, especially if we needed a big loaf for dipping, but we were mostly back to buying our bread at Publix-- and there are rarely sales on their bakery bread. I loved the bread machine, but we were just using it less and less. It eventually even got bumped on the counter. We have very limited space, so if I am not using an appliance much, it goes on top of the fridge. Sad, I know-- its lonely up there, but what else can I do???
Fast forward about 2 years. For Christmas this past year, my mom decided to arrange a session with her friend Kathie-- the expert bread baker. I think my mom remembered me talking about baking bread all the time. I thought it was super nice of my mom but I kept thinking in the back of my head...I probably still won't bake much bread after it.....but boy, was I ever wrong!!! My mom kept telling me that Kathie just uses her bread machine to mix the ingredients and do some of the rising then she takes it out, shapes, maybe lets it rise again and then bakes it. I thought- that sounds like a whole lot of work just for some bread. I had no idea what was coming. Here I was, a simple, giant-squared bread baker and there was this whole other world out there, full of delicious bread, loaves, rolls--- I just didn't know it existed. Well, thats not fair, I knew you could make all those things, but I had NO IDEA how simple it was.
Over Christmas break (we were in Cartersville this year), my mom and I went out to Kathie's house to learn the art of bread baking. I was still a skeptic here. She had already started some bread in her machine and it was ready for the next step, she had another loaf mixing in there and we were about to make tortillas. That's right, tortillas!!! Over the next 4 hours, I just tried as best I could to keep my mouth closed, between being shocked at how easy it really was and trying not to stuff all the delicious bread into my mouth the moment it came out of the oven. Kathie even grinds her own flour. She has an excellent grinder and gets her wheat in giant tubs that she keeps in her pantry. When she wants to bake a loaf, she just grinds what she needs (it was so easy, just pour grains into the top and it comes out flour) and uses it in her recipe. One day......
We made french bread loaves (that look like long loaves of bread, not the giant square ones the bread machine makes), rolls, knot rolls (what I show you how to make below), and tortillas. Currently, I am saving up to buy some of the french loaf pans and eventually a tortillas press (also cooks them). Maybe one day I will get a grinder. But I was talking to my mom about it and I would need to find a supply of grain somewhere closer because Kathie gets hers in Woodstock. I don't want to have to rely on driving that far if I run out. I know the tub lasts forever, but before I invest in a grinder, I need a more local source of wheat, so if any of you know of one closer to Athens, let me know!!!
Here are the knot rolls that I make once a week now. They are delicious! We use them as rolls, bread for sandwiches, everything! The recipe is below all of this if you need to see it without the pics! Thanks to Kathie for letting me share your amazing recipe.
Potluck Pan Rolls
3/4 c water
1/4 c suger
1 egg
1/4 c butter or margarine (I use butter)
2 tbsp. instant nonfat dry milk
3/4 tsp salt
3 c plus 1 tbsp bread flour
package active dry yeast (I measured a pack out because I buy a jar of yeast and its about 1 1/2 tsp. per package)
Combine all ingredients in bread maker- in order above. Make a little indention in the flour for the yeast. That way, it doesn't activate in the water too quickly. **This is where my version is a little different than Kathie's because of my breadmaker. Look to the end of this post for standard recipe. If you have the Cuisinart bread maker, just do what I do.**
After I combine all the ingredients, I set mine on a medium (1.5lb) size loaf, white bread setting and begin. The time reads 3:18 til finished. There is a series of beeps throughout the cycles. The first set (of 5) comes pretty soon and it means if you want to mix anything in (seeds, nuts, etc) that is the time. I do not mix anything, so I just ignore this set. Then, my machine is quiet. It will go through 2 rise cycles. Then, somewhere around 2:10 or so, I hear a little more mixing (just a few times) and I know I have a little longer before I need to pull it out. At this point, I will turn my oven on to 150. After my light goes off indicating the oven is warm, I turn it off. I want it just warm enough to let the bread rise in a little while- not cook it.
At 1:43, the machine will do its next set of beeps- 6 this time. The purpose is so I can pull it out, pull the paddle out, reshape before it begins baking. At this point, I am done with my machine. I prepare 2 corningware dishes (my casserole and square ones) by spraying it with cooking spray. I also spray a plate that I will use for separating and shaping rolls in a moment. Kathie taught me to do this instead of flouring because the flour dries the dough out so much. I will pull dough out and set it on the plate. Then, using my hands, I will divide in half, then continue dividing in half until I have 16 rolls. This is what it looks like:

I think the make real bread/dough dividers, but I just eyeball it. Yes, one or two rolls will come out really big and one or two rolls will come out small, but it doesn't bother us! After I have 16 balls, I will take each roll, and roll it like a snake:

Then, I will tie it in a knot like this:


Press the two ends of the snake together REALLY well, otherwise when it is rising, they will pop off and you will have a funny looking knot with an end sticking straight up. Yeah, its pretty funny looking. It has happened some here, but we are not ashamed, we eat them just as quickly as the others! Once you have pressed the ends together, move that part to the bottom so you just see the knot part at the top.


Then, set it in your pan.

Do all 16 of them. I try to let my biggest ones go in the corners of my square pan and put a smaller one in the middle.


Then, put syran wrap on top of each pan and put in the oven (that was preheated and turned off, so its just warm now) for 45 minutes. The will double in size.
Before:

After:

Lets take a moment and talk about my box of syran wrap. I know the picture in your head but you're probably wrong. Look at my amazing box of syran wrap--- it will last me FOREVER!!!! Jealous, I know!

So, after you have taken the rolls out, pre-heat your oven to 375. Take the syran wrap off. When the oven is preheated, stick both pans in. I set my timer for 14 minutes. When it goes off, I just take the square pan off the top rack. They look like this:

But, the other pan looks like this:

I give them 2-3 more minutes in the oven. Normally, 3 more minutes. Then, I take them out, let them cool and bag them up. Here they all are:
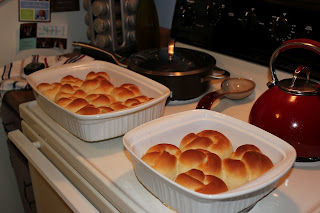
Is your mouth watering yet? Kathie has some really nice bags (I think they are ULine bags??)-- here they are:

I have found that we are eating them so quickly that the food and bread storage bags (Kroger brand) work just fine.

Here are all our rolls bagged up:

Maybe if I was giving them out as a present I would use some nicer bags, but if its just for us, the cheap ones work just fine. So, I hope you try some rolls, they are so easy. If you don't want to knot them, use the same recipe and just make regular rolls. You can also sprinkle some poppyseeds or toasted sesame seeds to make buns. I have done that-- they look so nice! Let me know if you try them! I love them and have not bought any bread since Christmas. I just make some rolls each weekend and we are loving it. Keenan really enjoys them too!! My next plan is to head to the store and price each ingredient and really come up with how much one loaf of bread costs. I would like to really know how much I am saving. If I were to grind I own wheat, I would save even more, but that's another day!!!
Enjoy!!
Kathie's recipe for rolls (follow my pics if you want to make them knots and my directions and pics are specific to my bread machine, you will have to figure out exactly which setting works best for you)-
POTLUCK PAN ROLLS
3/4 cup water
1/4 cup sugar
1 egg
1/4 cup butter or margarine
2 tbsp. instant nonfat dry milk
3/4 tsp salt
3 cups plus 1 tbsp bread flour
Package active dry yeast (I have found it to be about 1 1/2 tsp if you are measuring from a jar)
Combine all ingredients in bread maker, starting with water and ending with yeast (make an indentation in the flour to put yeast in). Set bread maker on dough setting. When dough cycle is complete remove dough from pan onto a dinner plate sprayed with cooking spray. (You may need to spray hands.) Divide dough into 16 equal balls. Place in a greased 13 x 9 inch pan. Cover with plastic wrap and let rise in a warm place for 30 to 45 minutes or until doubled in size. Bake at 375 degrees for 17-20 minutes. Rolls brown better on bottom if you use a non insulated pan.

4 comments:
Diana Maria said...
those were sooooo good! i need to pin this recipe in case i ever get a breadmaker!
Erika said...
ditto...lacking the breadmaker and any space to keep one. :( maybe i can join a breadmaker co-op??!
Lori said...
Love reading your post and will make rolls this weekend! Thanks for the recipe and photos - I am a visual learner. Time to pull that bread machine off the top shelf and get busy.
Sarah Klayman said...
Yeah Lori- so excited for you to make the rolls!! And Erika-- all the Bountiful baskets out west partner with bakeries and have baskets that can include bread, we just don't have the buying power to do it yet I think. I feel like its only a matter of time before they get a bread partner (and maybe get more organic). If you know anyone with a bread machine (so many have one and don't use it!), see if they will let you borrow it! Then, you can make bread all the time!!!